ETH Zürich Embedded Systems
Overview
During the Fall Semester of 2023, I had the incredible opportunity to both design from scratch and teach all practical components of the Embedded Systems course attended annually by 350+ students here at the ETH Zürich Department for Electrical Engineering and Information Science.
While the course ran successfully for its first few semesters, we are still working on updating and improving many different aspects. We plan on publishing and open-sourcing all course materials once they are ready.
Hardware
Developing such a course is a significant investment. With the MSP430 launchpads the course had previously used starting to break and become more and more outdated, we therefore also wanted to use this opportunity to switch to more modern hardware. Ideally, we were looking for a platform that used a standard instruction set (ARM or RISC-V), had good cross-platform support for the associated tooling (ETH runs on a bring-your-own-device model, so we have to support Windows, Linux, and Apple laptops), and was somewhat well established with broad industry adoption. While we do put an emphasis on teaching students transferable skills that will hopefully allow them to get up-to-speed on most platforms later in their career, picking something they might actually encounter later is always a sensible choice.
After spending some time looking around, and based on some of our previous experience, we found that most typical microcontroller development boards are hopelessly ineffective as a teaching tool. In general, manufacturer-provided boards fall into one of the following categories:
Basic development boards (such as ST's Nucleo line) feature nothing but a microcontroller and programmer, intended for the user to connect different peripherals via some connectors. The lack of different buttons, potentiometers, LEDs, and other "fun" components makes it hard to design visual and engaging exercises. While it would be possible to attach such parts to the board, this does not really scale with 350 students in a room - There are already sufficient problems that require debugging!
Full-featured development boards, on the other hand, tend to be stuffed to the brim with top-of-the-line parts that a manufacturer is trying to sell. While a full-color LCD and 24-bit audio DAC may sound like great peripherals to have for course exercises, I have found them to be far too complex for a student that has just started working with microcontrollers to tackle. Even if they are not used, the complicated schematics and documentation tend to lead to much confusion.
Finally, more education-focused boards, such as an Arduino, tend to be either hopelessly out of date or too simple to be an effective teaching tool.
Because of this, we opted to develop a custom hardware platform for our course. At first, we investigated a complete board with an integrated programmer, but quickly dropped the idea because the programmer firmware licenses of different manufacturers would make this either rather difficult or completely illegal.
Instead, we opted to develop a "shield" that is connected to an otherwise bare-bones NUCLEO-L476RG board.
We liked the STM32 platform because it is extremely capable and widely used while still being somewhat approachable. Their recent change to a fairly standard cmake-first toolchain also gave us the confidence that we would be able to support almost all student laptops, as we did not strictly require a proprietary IDE. The new VS Code plugin was a nice touch, because it allowed students to work in an environment that they are already familiar with.
By having all exercise components on a standalone shield, we are also decoupling the hardware investment from the availability of a specific Nucleo board: Should the NUCLEO-L476RG ever become unavailable, we could look for another compatible board instead of having to rebuild our course from scratch.
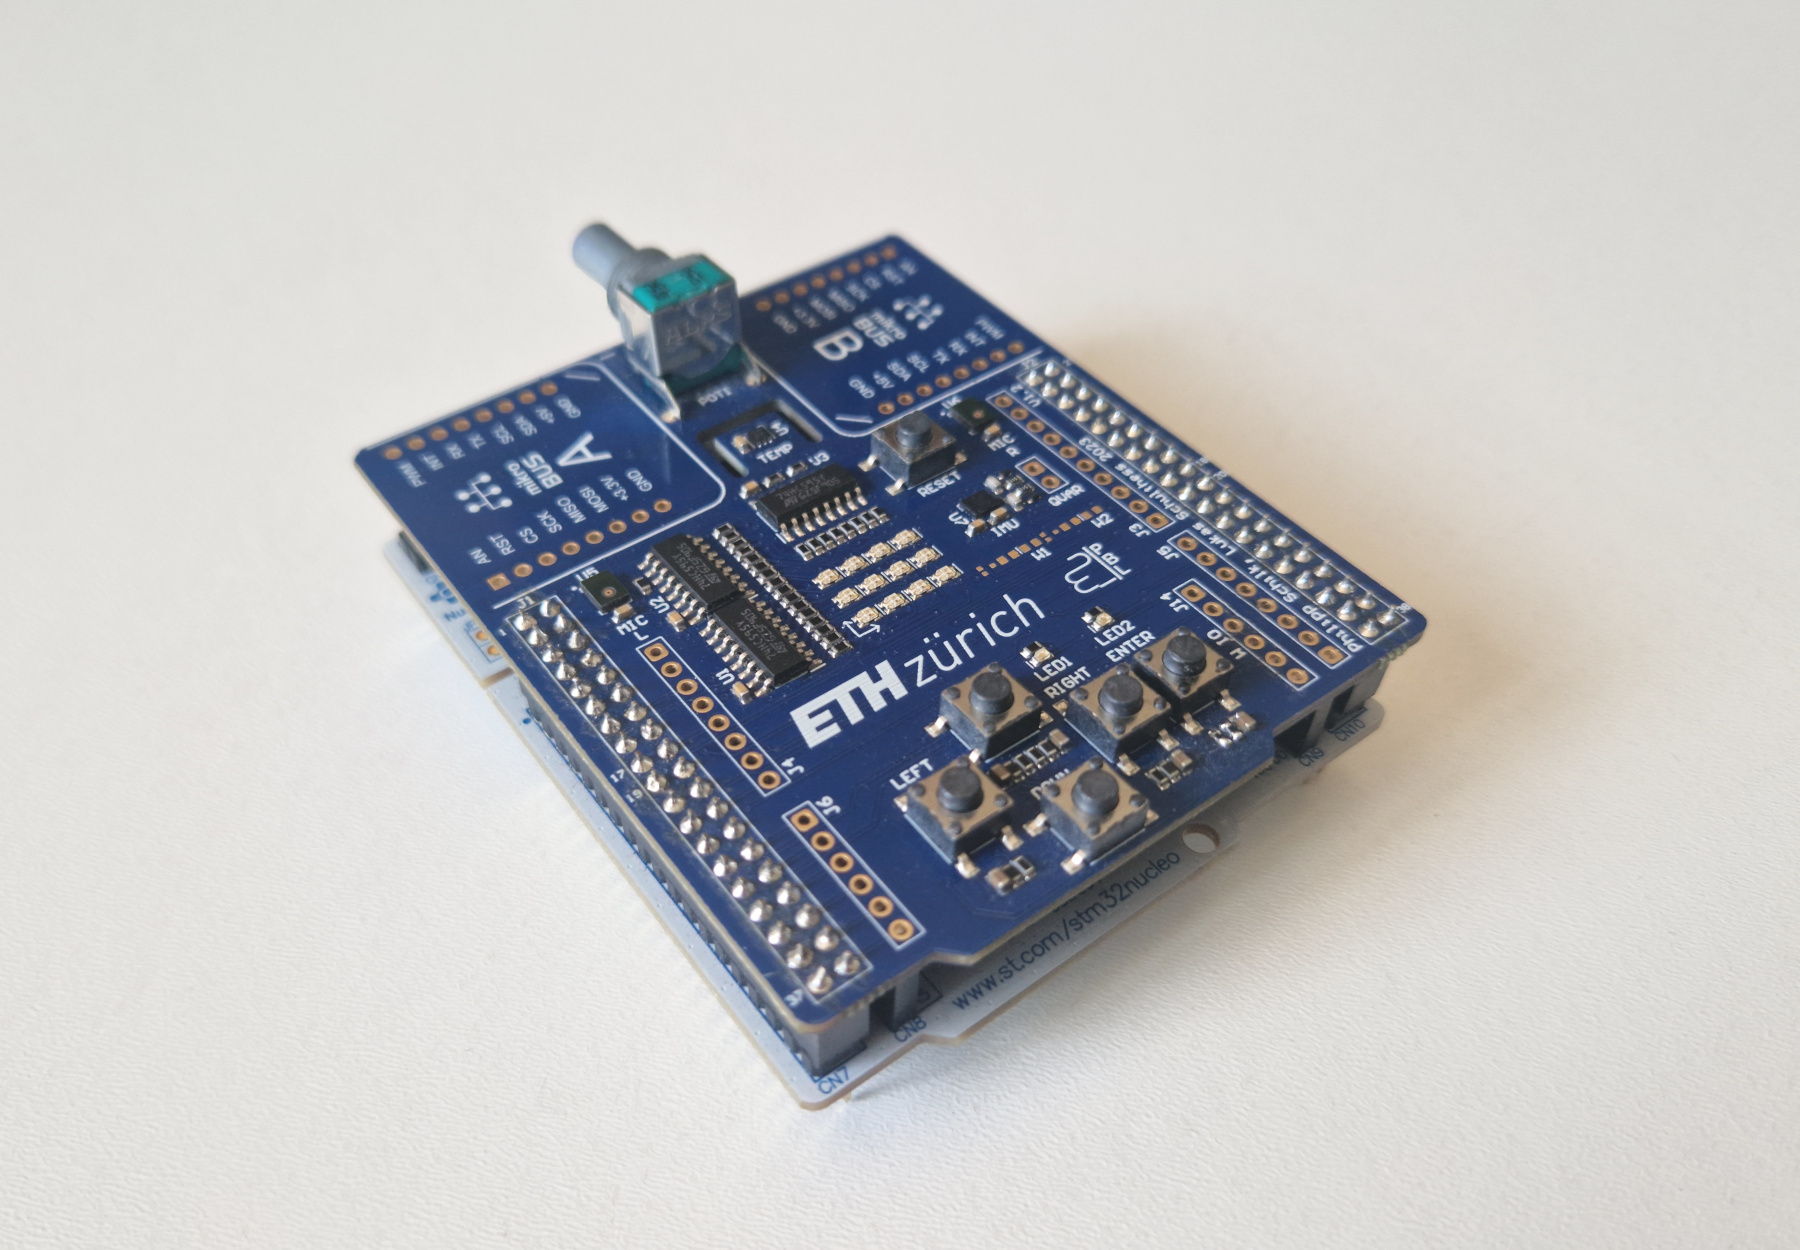
In particular, the shield features many simple peripherals, each of which we picked to provide both opportunities for learning and fun applications:
- Two basic LEDs for the essential "Blinky" exercise. This covers everything from the compilation and programming flow, GPIOs, schematic reading to the low-level details of registers and bit manipulation.
- Five buttons, placed in a game-pad arrangement. This provides much more flexibility for fun games and interactive exercises than the usual one or two switches found on most other boards.
- A bi-color 4x3 LED matrix controlled by three shift registers makes for a rather usable display with a bit of creativity. The shift registers lend themselves as a great introduction to serial communication and SPI.
- A potentiometer, serving as another control input for interactive exercises and a great application for learning about ADC operation.
- The I2C temperature sensor is a perfect introduction to both I2C and external peripherals, with a small enough register map and simple enough documentation to allow students to build up their own driver from scratch.
- Two PDM microphones, whose high data rate makes for a great motivation for the introduction of DMA. Furthermore, they naturally lend themselves to simple FFT-based signal processing that allows us to take a look at the advantages of hardware-accelerated DSP routines.
- An SPI IMU is a good example of a more complicated external peripheral, and introduces students to integrating a simple driver into their project.
- Two mikroBUS connectors make expansion very easy, should students want to explore other sensors and peripherals.
- Finally, a Wuerth WiFi module (mounted on the bottom of the shield and not pictured above) allows students to explore a whole range of networking and integration topics.
Labs
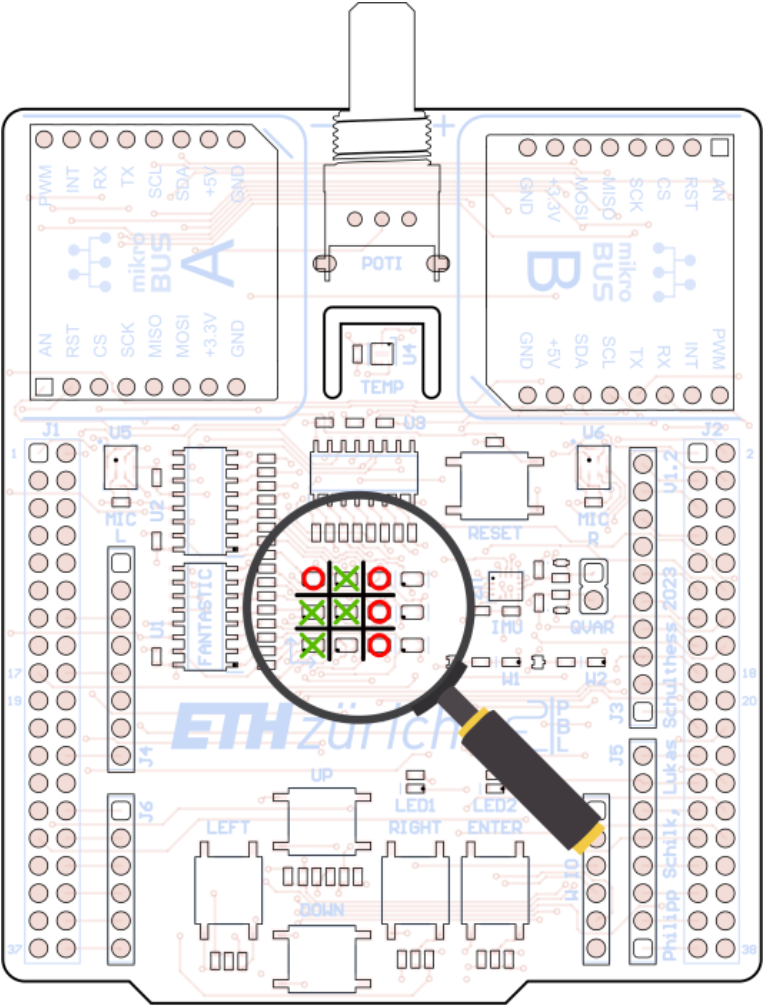
Snake on the LED Matrix.
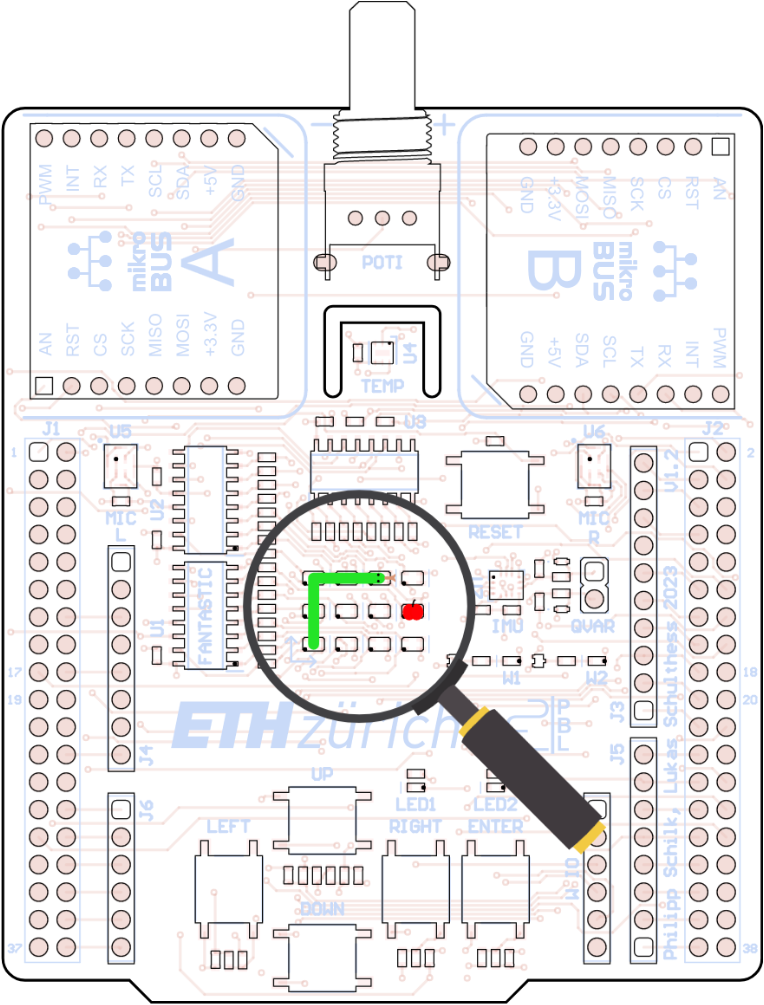
Tic-Tac-Toe on the LED Matrix.
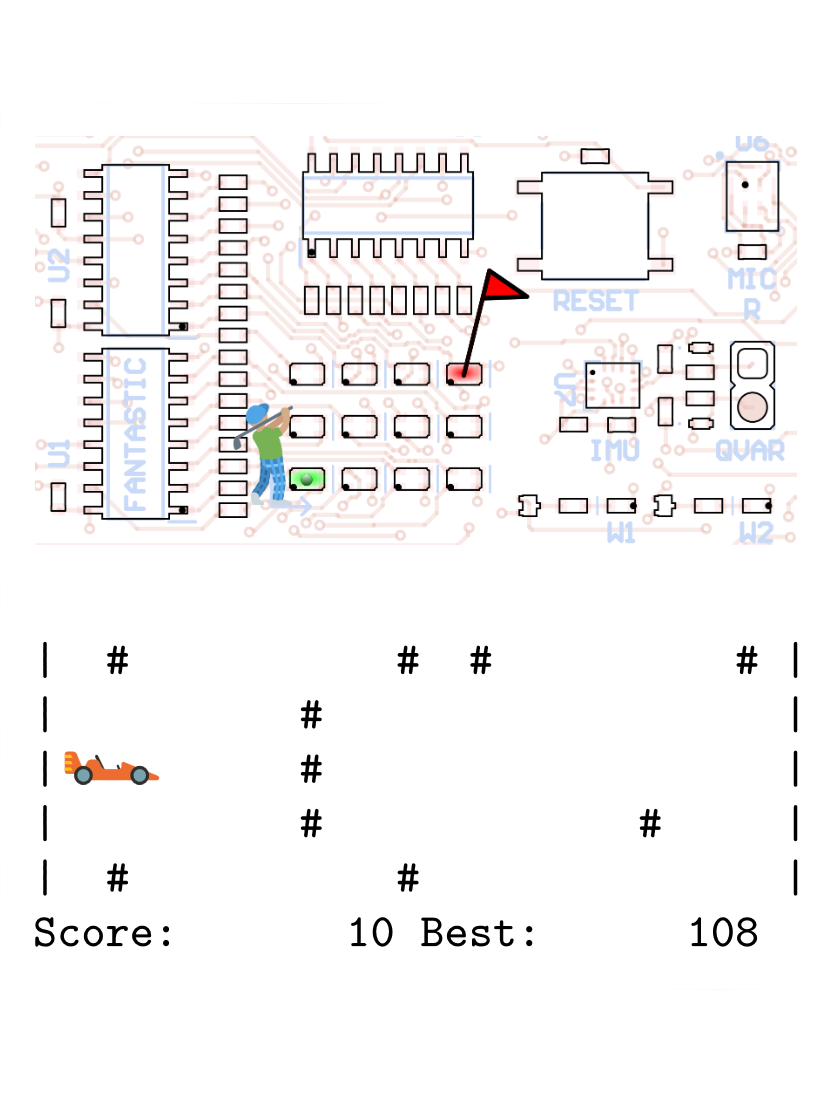
Golf and racing game.
With our new hardware in hand, I developed a set of 10 labs, each with multiple practical and theoretical exercises, code handouts, slides, and hundreds of pages of documentation.
They take students from the basics of embedded systems, to low-level assembly programming and register manipulation, to high-level applications built on FreeRTOS.
Some examples include:
-
A number of basic and low-level exercises, tackling bitwise operations, GPIOs, the manufacturer-provided library and direct register manipulation.
-
A task where students have to correctly interface with the four on-board buttons, allowing them to play a game of SNAKE! on the LED matrix.
-
A task where students have to correctly set up UART communication, allowing them to control a game of Tic-Tac-Toe on the LED matrix.
-
A task where students have to implement a simple Caesar cipher to decode a secret message sent via UART, allowing them to experiment with ASCII encoding.
-
Detailed theoretical exercises covering the I2C and UART protocols, including a task that requires students to both decode and "debug" an I2C bus based on provided oscilloscope captures.
-
Detailed theoretical exercises covering the operation of a Successive-Approximation ADC.
-
A task where students learn about ADC calibration, including the concept of a transfer standard.
-
Various timer exercises.
-
Practical exercises that allow students to experiment with different RTOS scheduling algorithms and topics, such as task priorities, preemption, time slicing, priority inheritance, and deadlock.
-
A task where students see RTOS stack-overflow protection in action - including some of its limitations.
-
A series of tasks guiding students in developing an RTOS-compatible logging system.
-
A task that demonstrates both RTOS tasks and queues by having a single IMU control both a game of golf on the LED matrix, and a simple racing game shown via UART.
-
A task that has students implement simple DSP routines using both vanilla C and ARM SIMD instructions and profile the speed difference.
-
A task that has students read data from the on-board microphones using the PDM interface and DMA, and use an FFT to identify the dominant frequency. The performance of a hardware-accelerated FFT routine is compared to a pure software implementation.
Software
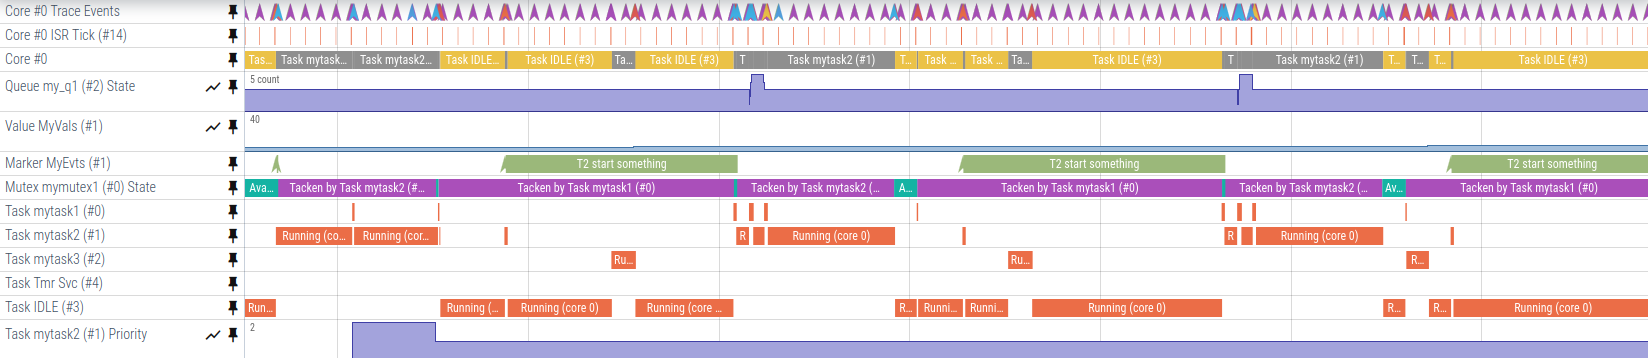
While teaching the course, I found that students had a hard time understanding what exactly was happening inside the microcontroller, especially when dealing with more complicated RTOS setups and task interactions. While they understood on paper how FreeRTOS picked what task to schedule, and how more intricate features such as priority inheritance worked, they struggled to gain an intuition and mental model of what exactly was happening, and had a hard time putting the theoretical knowledge to use when writing code.
We toyed around with the idea of using a commercial embedded systems tracer to visualize this, but unfortunately I was not able to find an embedded systems tracer that fulfilled all our requirements:
- Cross-platform (Windows/Mac/Linux)
- Free to use
- Does not require a specific debugger/programmer
So I decided to build my own! You can read all about Tonbandgerät here.